One of the trickiest parts of this kitchen design was knowing something needed added next to the cabinetry, but also feeling like I didn’t want anything substantial like bulky open shelving, for example. It’s an area I considered for quite awhile because I’m huge on symmetry, and I knew whatever I did there I had to repeat for the coffee bar.


I toyed with the idea of a vintage open glass hutch piece that would sit on the counter but meet the height of the existing cabinetry. I love this idea for added character, a little warmth, and something unexpected. However, I kept coming back to my inspiration with this organic tile. I loved how airy and open the space felt, and wanted to keep this tile the focus.

One thing I absolutely love about so many kitchen designs I admire was a form of shelving with a brass gallery rail. Most were a built-in hutch or were open cabinetry.

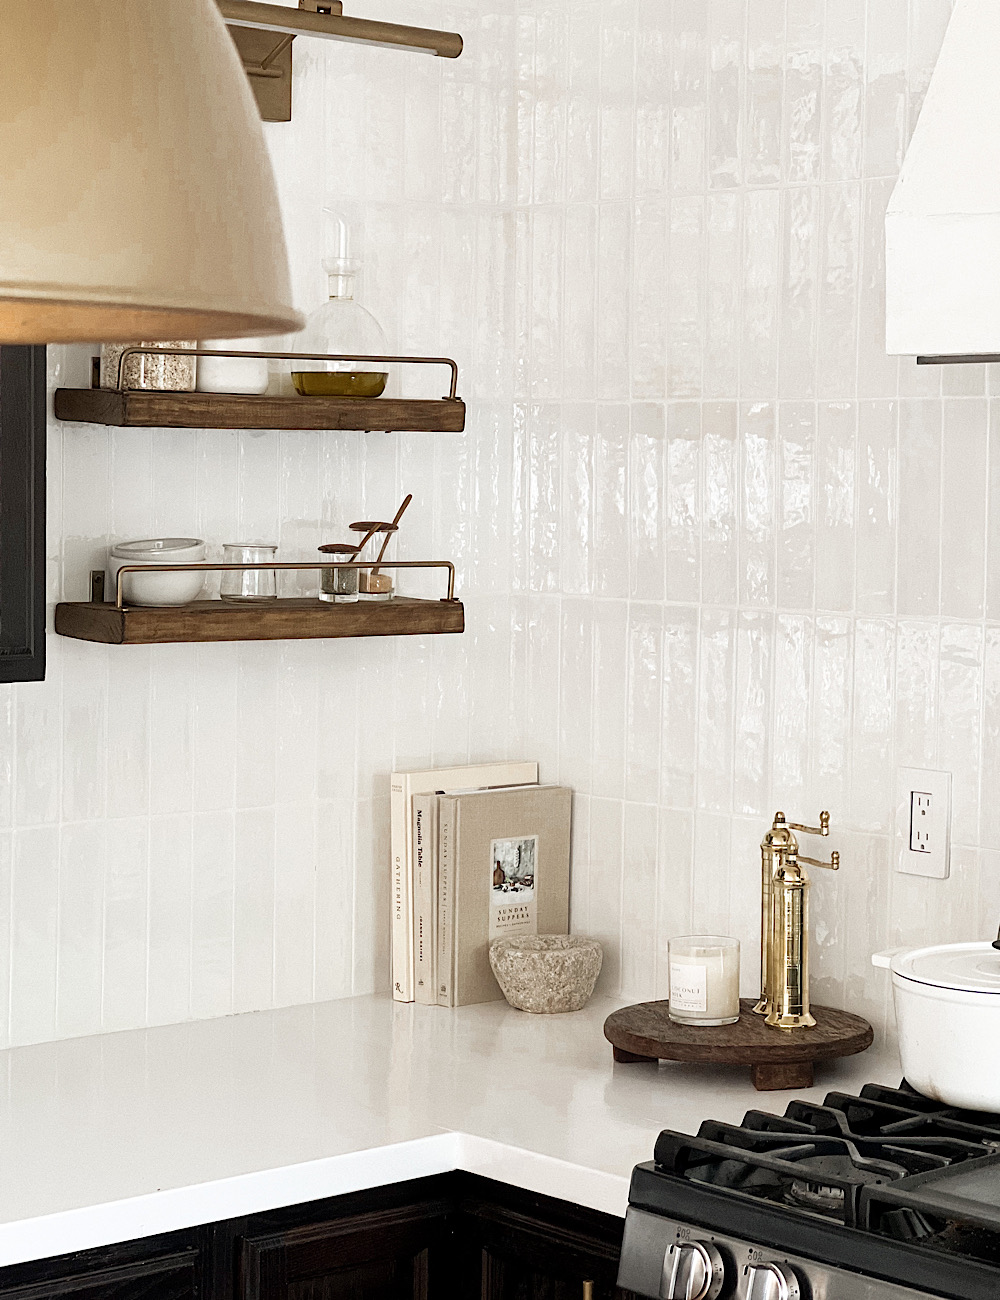
I knew I needed something way more minimal and smaller scale. So I came up with this: DIY Minimal Shelf With Brass Gallery Rail


HOW WE MADE IT-
First, choose your wood. This is a simple project and the type of wood can really make a huge difference here. I wanted more warmth so walnut would be a great choice. On a tight budget? You can always use select pine and distress it using my aging wood technique and stain it found in this post HERE.

Cut wood to size. I wanted these very minimal so I went with a 2″ thick board and only 6″ wide. This obviously can’t hold dishes or anything larger, but that was my intention. I’m utilizing these as minimal spice shelves.

Then, simply install- I found thin, simple corner braces HERE, and used a diamond bit to drill through the tile. Nerve racking but it really is simple. Be sure to use strong anchors! I like that I can easily hide the bracket with pieces on my shelves because they’re so minimal and simple.


For the gallery rail there’s a few options but everything I found was more vintage or too traditional than the look I was going for. You can find true gallery rail pieces HERE and HERE. I opted for a sleek but beautiful brass towel bar, found HERE. I went with the medium size to fit my shelves flipped down. We used the included screws to attach to the front end of the wood.

It has a very similar vibe but is much more cost effective than using vintage or custom gallery railings, and also has a little more sleek, modern/transitional feel. I especially love the warm walnut with the brass against our white organic tile!

I love how dainty they feel and act as just a small accent in the overall space. They’re the perfect size for salt and pepper dishes/mills, oil and vinegar bottles, small glass food storage, and more. A long oversized shelf like this I could see being so beautiful in a pantry lined with glass jar spices. It would also look beautiful in a small bathroom space with perfumes, marble storage for q-tips, and a little candle. I would love to see if you make these shelves tag me on IG or send us a photo so we can share it! Let me know any questions or thoughts in the comments below.

SHOP KITCHEN






I love this! Rails are so expensive and I was thinking of using long drawer pulls. I love when people get creative and make a great look like this for less. Your kitchen is beautiful! I love your tile and all the accents. Looks really classy and very well put together.
They really can be pricey! Thank you so much, I’m glad you like it and have found it inspiring!
Could you please re-link the rails you used for this project? I love this look and it is such a clever idea!
Hi! Yes, they’re no longer sold at this retailer I fixed the post but you can also find it here- https://rstyle.me/+L4a8IPuOimXbv84s3heHpA