
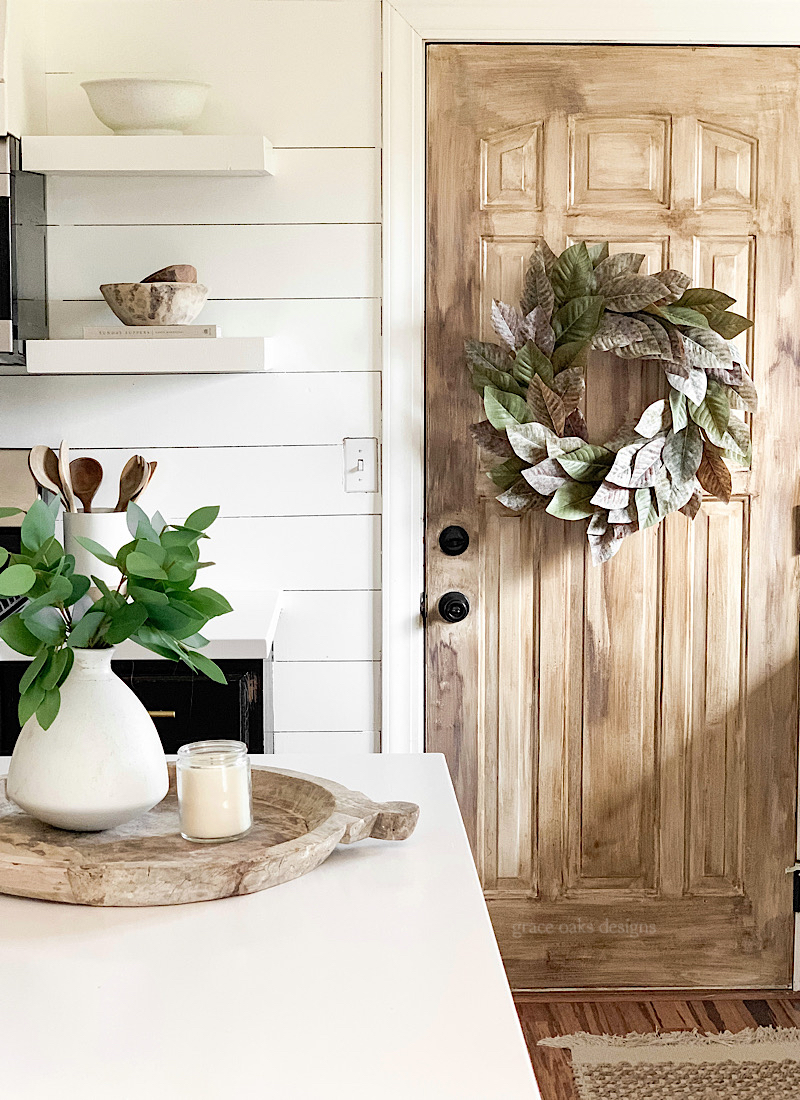
I’ve wanted to switch out our garage door in our kitchen for years! Last summer when we completed our kitchen refresh I kept hoping to find an old vintage wood paned door we could use. If you know anything about wood doors, they’re both PRICEY and hard to come by in specific sizes. Spoiler: we never found one. Instead I found a product to create my own wood finish for my existing door. I also got nervous and never did it. Until now.

Then, a couple weeks ago we started working on my office refresh, and those ugly bifold closet doors kept staring at me. Sure, there’s ways to refinish doors: trendy sliding barn doors, and even resurfacing old doors with wood planks. Neither of those options were possible as I had to keep the bifold function with my built-ins. I finally decided to use the product I had in my stash since our kitchen refresh intended for that door and knocked them both out!

I used a gel stain to create a faux wood finish on both of my doors. This stain is meant for veneer, fiberglass and other non-wood surfaces especially useful if applying vertically. This project is super simple and only required 2-3 materials. I barely even used any out of the quart I had. This product is perfect on exterior garage doors and staircase banisters or treads as well!
I only cleaned my surface with a mild cleanser first. This requires zero prep work- no sanding! Hallelujah, am I right?


Be sure to start applying the product in small sections, you don’t need much at all on the brush. Use long brush strokes up and down or side to side, following the natural grain of the surface. It helps to do long strokes first then go back over and blend it in.

I also used a different dry brush to blend and work the product in. It is a bit of an art form. I recommend trying it out on a scrap piece of wood to get the hang of it first. Apply the stain just as you would paint a door. Up and down on the sides, horizontally along the top and bottom and middle. Continue using the brush to do long strokes back and forth and up and down to fill in the panes.

Keep blending it in with the dry brush. Once it’s starting to dry, maybe an hour later I added my favorite liming wax to lighten it up and give it that aged look I wanted. This step is totally optional. I used a paper towel and very lightly worked it in following the same technique as above in some areas on the door.

I noticed the next day the door looked a bit lighter, and as it continued to fully dry and cure it lightened up a bit more. This stain doesn’t have an overpowering odor. I had the door open as I applied but in my office I didn’t have anything besides the door to the room open, and was totally fine.

If you want to seal to protect the door that is the final step. I suggest using Minwax Polycrilic for interior projects because it will not yellow! If you’re doing this on garage doors or an exterior door you’ll want to use an exterior polyurethane to protect it from the elements.
I love how this project came together. I’m so happy with the outcome. I’m thinking about adding it to our garage door this spring once we start tackling some outdoor projects too! The aged oak is the perfect light wood tone. If you try this project I’d love to see yours, tag me or send me a photo so I can share on IG stories.


Thank you for writing this! This was exactly what I was looking for!! LOVE your kitchen & how this turned out!
Thank you so much! I’m glad it’s helpful for you!
If this doesn’t turn out as good as yours, can gel paint be painted over with latex ? Thanks
Hi! Yes, it can be painted over! Good luck
Can you share the types of brushes you used? Going to attempt this! We also can’t find an aged door and I’ve given up on that at this point. This is the perfect compromise
Hi! I just used a regular angled paint brush. Anything will do. I blended the white wash with a towel buffing it into the stain after applying.
Hi Hillary, I am looking to stain new fiberglass doors. Just wondering if your kitchen door was fiberglass or wood? The salesman is concerned that I wont get a light wood look with a fiberglass door because it already has a tint to it. But, yours is the perfect color.
Hi! Yes, my door was fiberglass. I also did the same on a standard bifold closet door with the same outcome. My door before the stain was white which helped. If yours is another color I’d first paint it white then do the gel stain. Good luck! I’d love to see how it turns out.
Hi, this turned out beautiful! I’m going to attempt a bathroom vanity. Can you tell me which liming wax you used? Thank you!
Hi there! Thank you! It’s Valspar from Lowe’s.
Looks amazing, what liming wax did you use?
Hi, it was Valspar from Lowe’s.
Looks amazing! Could I use this technique on orangey fake wood laminate cabinets? Would I need to paint them white first? Also, could I use the liming wax and then seal with the polycrilic sealer for durability? Sorry for so many questions but I’ve never done anything like this and I always love your projects
Hi there! No worries I’m happy to help when I can. I think it would work great on cabinets with proper prep. I would very lightly sand, prime the cabinets with a solid great primer, and then finish with the gel stain. Definitely seal them using several coats!
Did you wipe the stain off or just let it dry?
Hi Cindy! I applied and let it sit for a few minutes then wiped access off. I also then buffed the valspar limewash glaze overtop and working it into the stain. Hope this helps!
Did you sand at all? I tried this inside my kitchen cabinet because I really want to do this to my cupboards but it looked terrible.
No I didn’t sand. It’s a fiberglass door. I also did them on traditional bifold doors and had no issue. Be sure to clean, lightly sand, then apply.
I tried to use a minwax stain on my white kitchen cupboards. I did the inside of one door and it was pretty much clear with what looked like dripping grease or dirt. Is the gel stain different and would it work on kitchen cupboards? If you think so should i sand a bit first?
Hi! You definitely need to clean and sand first using either stain option! Always start with a degreaser to cut that. You can also use a deglosser instead of heavy sanding. But a light sand would be necessary with the gel as well.
Hi! I’m currently attempting this project in my kitchen. We are having a very difficult time getting the stain to dry. We let one coat dry about 8 hours and it came off on our hands just touching it. Any suggestions?
Hi! It does take a while to dry. Especially the more coats you do. Just like any other stain. I think with the coats on my door it took an entire day. We used the door knob when necessary but didn’t touch the door itself for 48 and it was perfect.
Hi, I applied the gel stain, used the dry brush technique, however I did not put the liming wax on after an hour, as you stated you did, because the doors were so tacky. They are completely dry now and I’ve attempted the lime wax in a small area…nothing happened. Is it necessary to put the wax on after an hour to get the whitewash effect?
Hi! If it didn’t do anything after it’s dried then yes. Some surfaces react different to the product. I did apply mine shortly after so the stain was still tacky and I think that helped the blending of the limewash. You could try going over it with another layer of gel stain (very lightly) and then apply the limewash again once it’s tacky.
Pretty! I love the way it came out! I love that light raw wood look.. Can you seal with a polycrylic over liming wax?
Oh also, what type of finish was the door before you started? Just curious. Ours are all a couple layers at least of semi gloss white paint. I’m thinking I may need to sand a little first and not sure if the wood grain will show through ours.
Hi! Thank you it’s really nice tone. Yes, you can. My doors were hollow core closet doors and a fiberglass door. They had both been painted white prior. The fiberglass door didn’t have a wood grain you create that look with the gel stain. My closet doors were easier because it had that already.
Can this gel stain be used on an oak veneer table? I hate the orangey stain, and I’m so close to selling it and just not having a table.
Hi, sorry for the delayed response I didn’t see this comment sooner! Yes, you could definitely use this on a table. Be sure to use Minwax polycrilic to seal it for protection and easy clean up. I like clear matte so it doesn’t give the finish any sheen.
Just wondering what the brand of the liming wax is?
Hi! It’s the Valspar Limewash wax from Lowe’s. However, I believe it’s now been discontinued, I’m sorry! Any white wax on the market will do the same thing and give the same look!
what liming wax did you use? it looks beautiful – i want to do the same to my dining and coffee tables!
Hi there! It’s the Valspar limewash wax from Lowe’s. I believe it may now be a discontinued product. Any white wax will give the same look!
I know you said the liming wax was from Valspar and you got it at Lowe’s. Is it the antique glaze or what? I did this on my pantry door but wanted to lighten it up a bit. Thanks
What color gel stain?
Hi there it’s in this post- it’s Minwax Aged Oak
Was everything painted white first?
Hi! Yes, it was white first which helped!
Beautiful!!!!!
Thank you!
I love this look of the doors. I have solid oak doors through out my home. The are an orange finish to them I don’t like it but bought this home recently. How can I achieve this look on these orangey doors? I assume I need to sand the doors then apply the glaze.
You could or you could prime with a white primer and then apply the gel stain over top. I had a white surface beforehand to get this color finish.
What is your favorite liming wax you mention? I have a 5 panel door with horizontal panels that I’d like to try this on. But I am not really sure about the directions of strokes. Will definitely to try it on a sample first. Thanks for the inspiration!
It isn’t available anymore, unfortunately. But any white finishing wax will achieve the same thing. Home Depot has a Behr version.
What color stain did you use? Looks awesome!
The photo and info is in this post – it’s Minwax Gel Stain in Aged Oak!
So if I understand correctly, you did this over the paint already on the doors correct? Also, could is this be done on the old darker oak cabinets without sanding or would that totally change the color? Thanks!! And it looks great!!
The original paint was white and it worked well over that to get this color. I’m not sure how it would work over a surface that’s dark. That isn’t the look I have achieved here by a lighter original color. If anything you could paint primer or white beforehand.
Love how your door came out! I also used gel stain for the first time on a bookshelf I refurbished. I mixed paint with it to give it a lighter look!
https://katietshome.com/transform-your-bookcase-with-this-diy-bookshelf-makeover-idea/
Thank you! That’s a great idea.
I love this technique! You did a fantastic job. I’m in the misrule of repaint the inside of my front door and had planned on just going from the orange dark brown to white like the trim, but decided to search for other ideas.
My only doubt is I have so many other woods in that room and wondered if it won’t blend in to the surroundings. Primer is on, so wanted to say, “Thank you for sharing”!
Also…my door is natal but has the groves in it for staining purposes.
I’m glad you found this idea and like it! Good luck!
This is beautiful! As you said, the Valspar wax has been discontinued, could you please recommend another kind for this beginner DIY-er ! Also, is the Valspar antiquing glaze the same thing? Which is better? The wax or the glaze? Thank you so very much!!
Hi! The antique wax gives it a distressed darker aged finish over top whereas the white wax lightens the wood tone. Behr has a white wax at Home Depot that works great!
What liming wax did you use?
Hi, it was Valspar from Lowe’s but no longer available. There’s a Behr White Wax from Home Depot that will work the same.
Love so much how this turned out. I’m attempting this on my pantry door. I did the inside first to test it. How did you get yours to not be shiny? Did the wax help? Thank you for the inspo!!
Hi there! Just responded to your last message but yes the wax helps. If you can’t find this wax anymore the Behr white wax from Home Depot will give the same finish.
Love this!! I’m attempting this on my pantry door. I did the inside first to test it. Did the wax make your doors less shiny? Thank you for the inspo!!
Hi! Yes, the wax also helps with sheen. I use a matte polycrilic to protect over top and that also helps it doesn’t add sheen.
Does this work on painted cabinets?
Hi! It can work for cabinetry but you’d be better off sanding and doing the prep work for a solid coverage and for longevity. I wouldn’t apply directly over painted cabinets like I suggest for the door in this post. It won’t last as long.
Really like this! So many other project show really dark wood grain….not my thing! I’m inspired to try a weather grey wood grain now. Thanks for a great post!
Thank you! I’m glad it inspired you!
Hi you never mentioned what was your favorite liming wash or if a clear gloss polyurethane will work and still give a wood look for an exterior door.
Hi. The liming wax I used is no longer sold. Behr makes a white wax sold at Home Depot you could use to get the same look. I would not use a gloss poly and definitely not a polyurethane as the finish will yellow over time. You want to use a clear matte polycrilic.
Beautiful job. I have an old wood table. Could this work on it to create a farm table look?
Yes gel stain can be used over wood. This tone is really pretty.
So beautiful! I love the dimension!!
Just ordered the products to try it out on my front door. Fingers crossed, because I think it looks amazing in your pictures.
Any tips on a wood look for a flat surface??
What stain color of the minwax gel stained did you use here?
what stai. gel color did you use on the doors? Aged Oak?
Glad I found your article! I am going out on a limb and planning to do a faux wood finish on a new pair of smooth fiberglass front doors. I found a your tuber with fabulous wood grain tools and a good overall process, but I was still in search of what color stain and base paint to use. Also, I’ve never heard of liming wax—could that be used on an exterior door? Thanks!
Hi! Your door looks beautiful. What liming wax did yoU use?
Thank you!
Becky
Can this technique be applied to exterior fiberglass garage doors? Is the liming technique also suitable? The standard white door is uninspiring, and I believe the aged oak look will enhance my property’s value.
I have primed white internal doors & wanting to give them an oaf effect look very similar to yours. I have been looking & read mixed advice, what do you suggest?
I
Hi, I’m curious how these have held up in the couple of years since this article was posted. Would you mind sharing please??