


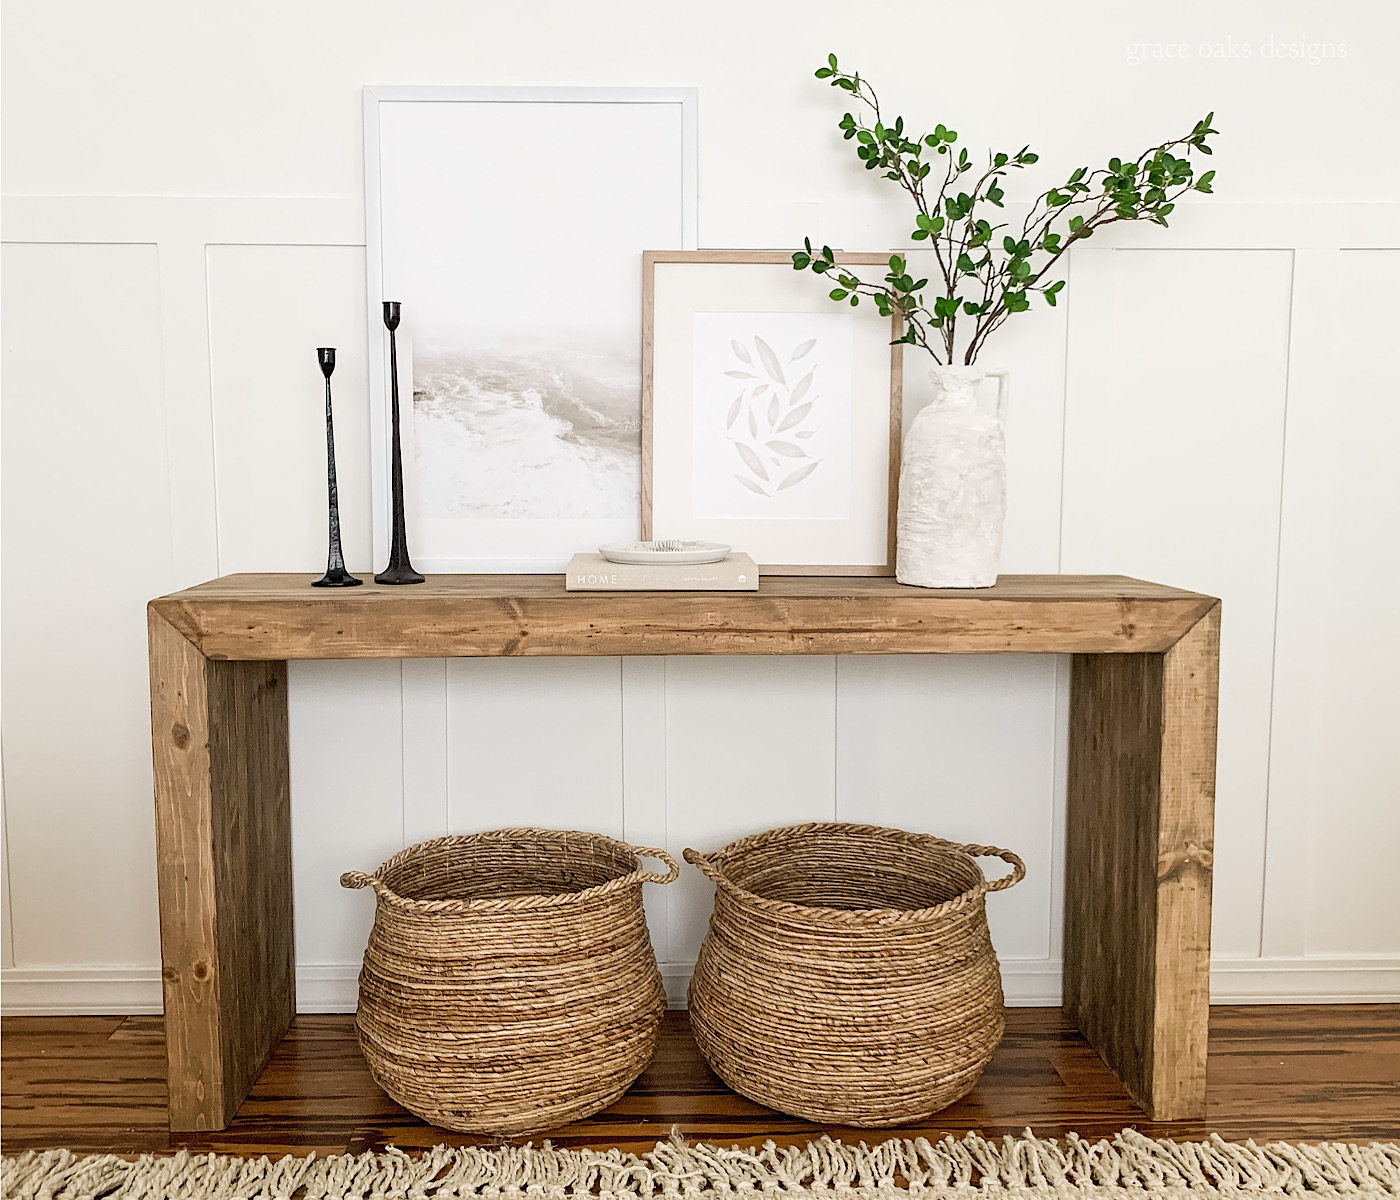
Back when we did our living room refresh I was obsessed with this gorgeous reclaimed wood West Elm console table, just not the price tag it carries. Like usual we sought out to DIY a major dupe!

This one was a bit trickier without a planer to get those squared off edges on the pine boards. However, it is possible to get a clean finish without one. Using only 15 2×4 pine boards, this table cost about $50! Major dupe for that $500 table.

I missed most of the building process, and have shared that on IG, but so many of you are wanting the plans/process to make your own. So, here’s the tutorial below – really hope this explains it well without all the photos!

1. Cut 10 2×4 boards to desired height at a 45′ angle on one end. Ours is 31″H.
2. Leaving the first 2×4, using 3″ screws pre-drill holes and screw 4 2x4s into each other on one side.
3. Once 5 are completely screwed together use 3/8″ dowel rod and wood glue to attach the two sides together. Clamp till dry. Repeat steps 2-3 for the second side.
4. For the top cut 10 2×4 boards to desired width. Ours is 54″W. Cut both ends perpendicular at 45′ angles.
Essentially like this: \ /
5. Repeat same process as the ends screwing 5 boards together then attach in the middle using 3/8″ dowel rods and wood glue. Clamp to secure till dry.
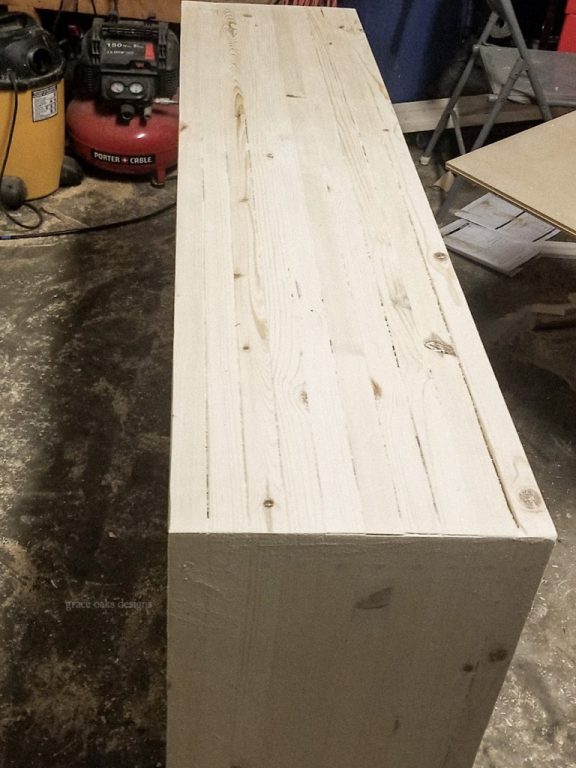
6. Next, using a router with a straight edge bit, cut the top of the boards until all boards are even. Alternately, if you have a planer use that for this step to square off each edge.
7. Cutting with router at 1/4″ makes it easier to ensure router does not bind down and gouge wood. Once at desired depth, repeat with router on both height side pieces.

8. To attach the sides, use 3/8″ dowel rods and wood glue to fit the 45′ angles of the sides and 45′ angles of the top, repeat for the other side.
9. Use 3.5″ screws to secure sides into top of the table on the underside for added support.


10. Sand corners so both 45′ angles meet smoothly together. Also, sand top and sides.
11. Finish as desired. If you choose to seal this piece, I recommend Minwax Polycrilic in clear matte, it won’t yellow the finish + doesn’t have a sheen.

I used my favorite custom stain mix: Minwax Provincial and Weathered Oak diluted with a bit of water. Then, added Valspar limewash glaze over top of every few boards to create a variation in each board.

With limewash glaze added over top on some boards to add variation.

I don’t have nearly enough photos to show each step, but I truly hope this helps if you’re wanting to make our console table! I’d love to see yours if you do – be sure to tag me on IG or send me a photo, I love to share your projects inspired by our DIY’s!


When you mixed the stains, to crate your color, do you use 1/2 and 1/2? Thanks in advance.
Hi! How I create and mix my custom stain can be found here- https://graceoaksdesigns.com/custom-mix-stain-at-home/ Remember to always test a scrap piece or the underside first. All wood tends to take it differently so I adjust a little here and there accordingly.
Question! Where do you put the dowel rod? Are you putting it right underneath? This is BEAUTIFUL!
What is the depth of your table?
Hi, it’s 15″ deep.
Good morning! I love your work! I’m trying to make my own pottery barn Folsom table. Where exactly did I buy this thick wood? I’m assuming 3 inches is what I’m gonna need. Am I gonna glue two pieces together if I get 2” pine.
Hi! It’s not a solid piece, it’s 2x4s glued and screwed together to create “slab” look pieces for the legs and table top.
Hi there! They are 2×4 pine boards. Yes, wood glue them together to create the slab or one piece of wood look legs.
How are you attaching the legs to top?
Hi! You join the 45′ angles of the sides and tabletop together, drill on the side of the leg slab pieces and attach. Fill hole with sawdust and wood glue mixture, cover hole with dowel and sand. Hope this helps!
I wish we could see how you attached the boards and screwed them together as I cannot visualize the process. This table is awesome, but I have no idea how to put it together.
Hi there! Sorry you’re having trouble with it. Unfortunately this is just a general how-to and not a step by step tutorial. I didn’t document the entire process very well. Each slab piece the legs and table top is created using the 2×4 boards on their 2″ side. Wood glue them together, clamp and let dry. Attach each leg slab to the tabletop by meeting the 45 angles and drilling on the side of the leg slab into the top to meet those corners. Fill hole with sawdust and wood glue mixture with a dowel piece and to cover the hole. Sand and stain. I hope this helps more.
Hey! Thanks for this walkthrough it’s really helpful. However, one part of the process I’m struggling to visualize is the routing. Is the idea to use a 1/4 straight edge along the tops and outside of the vertical legs to create a consistent edge where the short side of the 2x4s are exposed and may have some deviation in how they meet?
Hi! Yes, exactly. If you’re using high quality wood you may not have this issue. Typical pine will have a bit of a groove or lip to the sides they aren’t exactly squared edges or straight. Using a router to clean those edges up gives it a better look and the boards meet nice and clean.
Hi! Love this table – just made the left/right sides and the top using 14 2x4s. Just having some trouble attaching everything. When I lay it out on the ground the 45 degree angles don’t line up completely flush (some of the wood might be a little bit bowed)
I have an electric hand planer – did that help at all with the connecting process? Or do you think it’s too bowed to finish the project. Thanks!
Hi! Make sure you’re using a level surface first. If it is close I’d say a hand planer could help get it flush with a little sanding as well. But it really depends how bowed the boards were. Hopefully you’re able to make it work!
Hello, thanks for these instructions.
How did you end up clamping the legs to the top? did you use a 90 degree clamp? I am having trouble connecting the 45 degree angles
Thank you!
Hi, I don’t believe it’s sold any longer. It’s a white lime wash wax. Any white furniture wax will work the same way.
[…] Click to see the this Small Hallway Table DIY! […]
How many screws and rods and boards do you need to build this. I didn’t see an approximate count of anything.
Thanks
On the screws did you use pocket holes or how did you attach the boards prior to the dowels? Thank you
hey! how did you get the to 45 to come together to screw in or even out a rod in them! i’m struggling-
[…] graceoaksdesigns […]
hi, i am in Germany and need to order similar one console like this one only with a 2 meter length,
can some one get in touch with me
talktoalireza@yahoo.com
+491733059466
We don’t sell them. This is a DIY tutorial so that you can create your own.